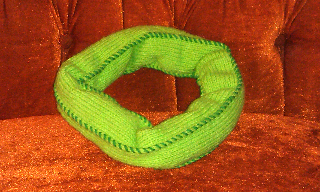
Oyster stitch cowl
I promise that I am not dead! The first part of this year has flown by in a whirlwind of traveling, hiking, seeing friends, working too much, and generally being a wee bit over scheduled.


This cowl is NOT an easy pattern, it has some tricks to it, but I am so happy with the result. I found some yummy merino wool from Mountain Meadows which really inspired me, mostly because it is so lovely and soft that I wanted to make it into something that would be near my face.
The Oyster stitch I found from 101 Stitches to Knit (Erika Knight, ed), but it was clearly written for something being worked flat. But with some adjustments, I was able to figure out how to translate it into something that can be worked in the round.
There is a set pattern for the rows and a small trick to adjust the steps where the oyster is split across the stitch marker. Basically, you'll knit the last 2 stitches of the previous row, transfer those 2 stitches back to the left needle, then work them into the oyster and proceed with the rest of the row. Then you'll start the next row 2 stitches early until you get back to a straight knitted row.
Gauge: 21 stitches to 4" wide and 24 rows to 4" tall in the Oyster stitch pattern.
I used a size 8 circular set measuring 22.5", use the size that you need to achieve the proper gauge size.
To start, cast on 162 stitches in a decently stretching cast on (I used a simple chain cast on). If you have a very large head or hair, or if you are much smaller than myself, feel free to adjust in multiples of 6.
Joint the round, making sure you don't have any twists, place marker and follow the starting rows:
Row 1 knit all stitches
Row 2 purl all stitches
Row 3 knit all stitches
Row 4 purl all stitches
Now the oystering begins. It is the same basic pattern over 4 rows, then repeats the pattern, starting at a slightly different point in the repeat.
Row 1: knit all stitches
Row 2: (knit 1, knit 5 wrapping yarn twice around needle) repeat until end of round
Row 3: (knit 1, pass next 5 stitches to right needle and unwrap, pass back to left needle, then take next 5 stitches through this group without moving group off the left needle and with each stitch, wrap the yarn twice around the needle, knit 1, purl 1, knit 1, purl 1, knit 1, releasing grouped stitches with final knit) repeat until end of round
**Note: Each group of 5 is your Oyster.
Row 4: (knit 1, purl 5) repeat until end of round
Row 5: knit all stitches
Row 6: take last 2 stitches from previous round and transfer to left needle, then (knit 1, knit 5 wrapping yarn twice around needle) repeat until 2 stitches before end of round
**Note: you could move the stitch marker to this new starting point, but I preferred to leave it where it was for fear of losing track of which set of 4 rows I was on and not putting it back later. This does mean holding it aside while doing the oystering on the next row.
Row 7: starting at the same point as row 6 started, (pass next 5 stitches to right needle and unwrap, pass back to left needle, then take next 5 stitches through this group without moving group off the left needle, knit 1, purl 1, knit 1, purl 1, knit 1, releasing grouped stitches with final knit and with each stitch, wrap the yarn twice around the needle, knit 1) repeat until end of round
Row 8: from 2 stitches before the beginning of the round with the last oyster, purl 5, knit 1) repeat until 2 stitches before end of round, knit 2
Repeat Rows 1-8 until it reaches a height that you like (mine was just under 10 inches), then it is time for the closing rows.
Row 1: knit all
Row 2: purl all
Row 3: knit all
Row 4: purl all
Row 5: knit all
Row 6: purl all
Then bind off with a stretchy bind off, or, if using a regular chain bind off, use a larger size needle for the right.
I blocked mine a bit and it is super snuggly. I hope that you enjoy yours as well!

Comments
Post a Comment