Moebius plushie
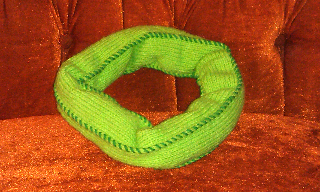
So this funky little thing is a Moebius plush that I decided to make for my father, a geometer. I had some difficulty wrapping my brain around it, and reached out for help to Ravelry when my brain felt overwhelmed. Got some great tips that went straight into the pattern for this little guy.
Materials:
I used size 6 double-pointed needles (4)
Ancient, mind-bending green worsted-weight acrylic yarn (less than 1 skein) and about 3-4 feet of a contrasting darker green for stitching.
Using a very thick yarn for this size needles meant that the piece is fairly stiff and sturdy. If you're a looser knitter, try a smaller needle or thicker yarn to get this combo for yourself!
- Cast on 33 stitches on dpns (I used slingshot/long tail cast-on).
- Transfer 11 stitches to each of 3 needles for knitting.
- Row 1: knit, join into round
- Row 2: [knit 1, slip 1 stitch purlwise at end of dpn], repeat [] 3 times
- Continue rows 1 & 2 until piece is about 30 inches long and looks like a triangle-y tube and appears to join into a fairly comfortable circle.
- Bind off as loosely as possible.
- Bring bottom and top together with sides matching (so it's a triangle-y circle), then turn the top so that the match is off by one side. (If the sides are numbered 1, 2, and 3, instead of the top of one matching with the bottom of 1, the top of 1 would meet the bottom of 2.)
- Graft one side of top and bottom together (I used the method from Stitch and Bitch).
- Stuff with fluff (poly-fill, remnants from an old pillow, etc.) until it's slightly full. If it's too full, it won't retain its triangular awesomeness.
- Finish grafting around. If you didn't aim them already into the plushy interior, use a crochet hook to pull the loose ends inside and hidden from view.
- Cut a nice, long string of the contrast yarn and thread it onto a yarn needle.
- Sew a simple, not too-tight whip stitch through the "seams" along each side of the tube. This is where you did your slip stitches to create what look like seams. Since it's now a moebius, it'll just be one long "seam" to follow!
- Tie the ends of the "seam" stitch together and pull into the fluffy innards.
- Sit back and enjoy an episode of Futurama or similarly awesome geeky entertainment.

Comments
Post a Comment